Moving my blog and getting to grips with Bicep!
Inspired by a recent presentation by Chris Reddington (@reddobowen) at the Limerick DotNet Azure User Group, I have made the decision to move this blog from GitHub Pages and Jekyll to an Azure Storage and Hugo based deployment. I will also be making use of GitHub Actions to implement a CI/CD workflow for my blog. Chris’ session was called “How GitHub Actions can help in planning, building, and deploying a Static Website and more”. If you want to catch the recording, you can find it on the Community page under ‘Past Events’.
I’ll also be using this as an opportunity to get to grips with Bicep, the new deployment language for Azure Resource Manager.
In this article (Part 1), I’ll be focusing on how I am using Azure Storage and Azure CDN to build a blog platform as well as the Bicep files used to deploy and maintain the Azure resources. In Part 2, I’ll go into detail on incorporating this infrastructure as code into a CI/CD workflow as well as information on the process of writing a new blog article or making changes to the site.
What is Bicep?
“Bicep is a Domain Specific Language (DSL) for deploying Azure resources declaritively. It aims to drastically simplify the authoring experience with a cleaner syntax, improved type safety, and better support for modularity and code re-use.”
– Bicep Github Page.
I’ve been getting to know Bicep for a few weeks now and, so far, it does seem a lot simpler than ARM Templates. In my opinon, ARM templates can be quite intimidating to work with. To date, Bicep is certainly easier to deal with and is also much shorter in terms of lines of code. For example, a simple Virtual Network with two Subnets deployment has about 60 lines of code as an ARM Template whereas the Bicep version has about 30-35 lines of code.
I encourage you to check it out for yourself. You can use the links below to get up to speed.
- Bicep GitHub Repo - Great place to start getting to know Bicep.
- Bicep Tutorial - Quick tutorial to get you started.
- Bicep Playground - Side by Side comparisons of Bicep and ARM Templates.
I’ll be using Bicep to deploy the Azure resources required to run this blog. I’ll be taking advantage of Bicep’s modularity to make the code as readable and re-usable as possible. As you will see later, we will start out with a ‘main.bicep’ file which will then call the various components required to build out the platform.
What is ‘GitHub Actions’?
GitHub Actions is a service from GitHub which is similar to Azure Pipelines (Azure DevOps). It allows you to create automated and customisable workflows for your code. I’ll be using the process of moving my blog to get more familiar with the capabilities of GitHub Actions.
If you want to learn more you can check out the resources below:
- GitHub Docs - I recommend starting with the GitHub Actions section of the GitHub Docs. You’ll find plenty of guides and quickstarts here to get you up to speed.
- GitHub Learning Lab - If you want to take a more hands on approach, you can check out the GitHub Learning Lab which has courses to walk you through various GitHub Actions related scenarios.
I’ll be talking more about GitHub Actions in Part 2 of this series.
What is Hugo?
Hugo is an open-source static site generator written in Go. The blurb on the gohugo.io website says that it is “The world’s fastest framework for building websites”.
You can find out more about Hugo using the links below:
I don’t need much in the way of fancy web frameworks or dynamic content delivery for my blog so a static site generator fits perfectly. It allows me to contribute to the community without having to worry about my lack of web development skills. It also allows me to write my articles in Markdown instead of HTML, which makes life a lot easier. At a high level, Hugo will take my Markdown files convert them to HTML and output a set of static HTML files to a ‘Public’ directory on my machine (or build agent as you’ll see in Part 2). I can then upload these files directly to my Azure Storage container to publish them to my site.
There are other static site generators available, such as Jekyll (which I am moving from) and Gatsby to name just two. If you want to know more about choosing the best one for your needs, you can check out this article on Netlify. It goes into detail on things to think about when choosing a static site generator.
I chose Hugo for a number of reasons. Firstly, it is open-source and I enjoy using open-source technology where possible. Developing your product in the open is a great way to gain trust and build a community. It’s also great for building secure and stable applications as your project can benefit from a global community of contributors. Secondly, Hugo is used by a number of other community members with great success. Checkout the CloudFamily or the CloudwithChris websites as two examples.
The Ask
As I work in the Azure space, I wanted to move my blog platform to Azure as well. As I mentioned above, I also wanted to adopt a CI/CD workflow.
While using GitHub Pages is free, moving the site to Azure Storage and Azure CDN will incur a small cost. Given the current size of the site, the costs for both of these resources will be very small. If you know the size of your blog or other static website you can use the Azure Pricing Calculator to generate an estimate.
‘The ask’ is to build an Azure-based blog platform using Infrastructure as Code and to be able to make changes or updates to the site, it’s underlying infrastructure, and/or it’s content using a workflow or pipeline. Part of the workflow should involve deploying site or content changes to a staging website for review before approving them for deployment to production.
The Infrastructure
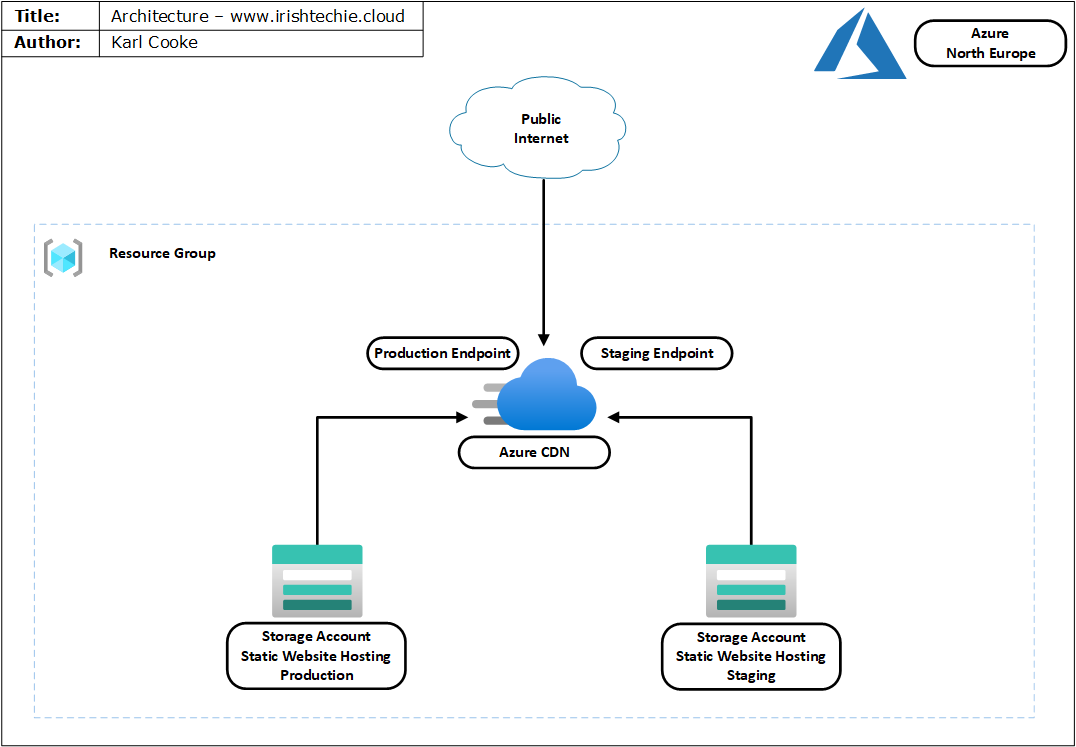
In terms of required resources, this is quite a simple deployment. As you can see from the diagram below, there are just 3 major components to the Azure infrastructure to run the site.
- Production Storage Account - Will contain approved, published content.
- Staging Storage Account - Will contain test content and work in progress.
- Azure CDN - Handles connections from the Public internet and delivers static content based on URL used.
Deployment
In this section, I will step you through the inital deployment using Bicep, where possible. For the initial deployment, I deployed the Bicep files via Azure CLI. In Part 2, I will integrate these deployment files into a GitHub Actions workflow so that any changes to the underlying infrastructure are automatically deployed.
To deploy the above resources, I am using 5x Bicep files (1x main file, 4x modules) and 2x Azure CLI commands.
If you’re interested, you can see how I’ve organised my repository below.
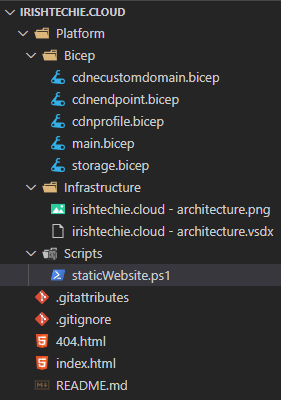
I won’t go in to detail on each bicep module as that would make this an even longer blog post than it already is! :) Instead, I will cover the deployment of the production storage account. If you want to see the Bicep code for the other modules, you can go to my GitHub repository here.
Let’s look at a few sections of main.bicep.
At the top of the file I set the target scope to ‘subscription’ as I will be creating a resource group to deploy the rest of the resources in to.
// This file operates at subscription level.
targetScope = 'subscription'
Next up, I set some parameters and variables that will be used later in this file and the module files. Calling out the variable ‘storageAccountHostName’ in particular, you can see that I am not just assigning a value to this variable. Instead, I am referencing the output from the module that depoys the storage account to create this variable.
// Set the parameters and default values, if required.
param environment string = 'blog'
param storageenv1 string = 'prod'
param storageenv2 string = 'stage'
param location string = 'northeurope'
param resourcePrefix string = 'irishtechie'
param skuName string = 'Standard_RAGRS'

var storageAccountHostName  = storageAcc.outputs.staticWebsiteHostName
Once we have the parameters and variables set, we need to create a resource group for our storage account to reside in. To create the resource group name, I am referencing some of the parameters defined above. One thing to note is that the ‘NewRG’ value below is just a symbolic name or resource identifier. We will use this later to tell Azure where to deploy the storage account.
// deploy a resource group to the subscription scope
resource NewRG 'Microsoft.Resources/resourceGroups@2020-06-01' = {
  name: 'rg-${resourcePrefix}-${environment}'
  location: location
}
Now that the parameters have been defined and the resouce group created, we can now deploy the storage account. I am using a modular approach the deploying resources using Bicep. In other words, instead of using one file to deploy everything, we are calling separate files for each resource or type of resource we need to deploy. Notice below that we are using the ‘module’ keyword instead of ‘resource’. We give the name of the module file, ‘storage.bicep’ in this case, and then pass in the parameters it expects. An important thing to note here is the scope section. You can see that we are using ‘resourceGroup(NewRG.name) here. This references the resource identifier we used for the resource group deployment earlier and pulls the name object from it.
Referencing other modules or resources in this way allows the smarts within Bicep to automatically create dependencies so that we can ensure that deployments take place in a logical order. For the most part, we don’t have to define dependencies manually while using Bicep. Of course, there will be exceptions to this rule.
// Call a separate bicep file to deploy storage account.
module storageAcc 'storage.bicep' = {
  name: 'storageAcc'
  // Change deployment context to RG
  scope: resourceGroup(NewRG.name)
  params: {
    resourcePrefix: resourcePrefix
    environment: environment
    storageenv: storageenv1
    skuName: skuName
  }
}
That finishes our look at ‘main.bicep’. Next up we look at our storage module, ‘storage.bicep’.
We start off by defining the parameters in the same way we did with the main file. The only difference here is that the parameter values are defined by the ‘main.bicep’ file and passed in from there.
You can also see that the ‘skuName’ parameter has a set of allowed values. If anything other than these values are passed in, you will get an error during deployment.
// Set the parameters and default values, if required.
param environment string
param storageenv string
param resourcePrefix string
param location string = resourceGroup().location

@allowed([
  'Standard_LRS'
  'Standard_GRS'
  'Standard_ZRS'
  'Standard_RAGRS'
])
param skuName string
I have also defined a variable within the storage module to create the storage account name by concatenating several parameters.
// Define variables
var stgname = 'sa${resourcePrefix}${environment}${storageenv}'
The penultimate section handles the actual creation of the storage account. You can see the various parameter names in place to configure the storage account name, sku, and other configurable items.
// Deploy Storage Account
resource storage 'Microsoft.Storage/storageAccounts@2019-06-01' = {
  name: stgname
  location: location
  kind:'StorageV2'
  sku:{
    name: skuName
  }
  properties: {
    minimumTlsVersion:'TLS1_2'
    accessTier: 'Hot'
    allowBlobPublicAccess: false
    networkAcls:{
      bypass:'AzureServices'
      defaultAction:'Allow'
      virtualNetworkRules:[]
    }
    supportsHttpsTrafficOnly: true
  }
}
The final section of ‘storage.bicep’ handles the output of the static website hostname which will used when creating the CDN Endpoint later in the deployment (not detailed here).
// Output the Static Website Hostname from Storage Account deployment.
output staticWebsiteHostName string = replace(replace(storage.properties.primaryEndpoints.web, 'https://', ''), '/', '')
Bicep is an abstraction from ARM and ARM Templates. We use the same Azure CLI or PowerShell commands to deploy the template files as we would with ARM Templates. Below, you can see the Azure CLI command to deploy ‘main.bicep’. As we are deploying at the subscription level, we need to specify the location.
az deployment sub create --location northeurope --template-file ./main.bicep
You can make use of the ‘WhatIf’ functionality by adding –confirm to the end of the command (see below). The result will be a list of resources and details on what changes will or will not be made by the template file.
Please Note: The default deployment mode for Bicep and ARM is incremental. This means that you can run and re-run this deployment repeatedly without destroying or recreating the resources. It will ONLY make changes to the deployed resources IF you change the code within the template file.
az deployment sub create --location northeurope --template-file ./main.bicep --confirm
The ability to configure a storage account to facilitate a static website is not exposed for configuration within ARM and Bicep templates. As a result, we need to use Azure CLI (or PowerShell) to enable this setting. You can see the required commands below.
az storage blob service-properties update --account-name sairishtechieblogprod --static-website --404-document 404.html --index-document index.html
Please forgive the syntax higlighting being a bit hit and miss. My syntax highlighter hasn’t caught up with Bicep yet. I may replace the codeblocks with images if the lack of correct syntax highlighting is an issue. Let me know what you think.
Please Note: These bicep files are also a work in progress. I expect to improve the code here moving forward.
What’s Next?
We have now deployed the underlying Azure infrastructure that will support the Irish Techie Blog. I haven’t mentioned yet that I recently added a new domain for the Irish Techie blog. The new primary domain for this blog will be www.irishtechie.cloud. You can use this link to track my progress in migrating to the new platform. The current and original site can still be accessed at www.irishtechie.com. The two domains will eventually direct to the new site as the migration completes.
In Part 2 of this series, I will talk about getting started with a local Hugo installation that I will use for testing out themes and designs for the new site. I will also be walking you through the setup and configuration of GitHub Actions to handle the infrastructure deployment and maintenance, as well as using it to publish new content to the blog.
Thank You!
This is quite a lenghty article. If you are still with me after all of this information, thank you so much for reading!