
My Cloud Native Adventure - Part 1
Welcome to Part 1 of My Cloud Native Adventure. If you read my last article, looking back over 2021 and forward to 2022, you will know that I was embarking on a cloud native learning journey. I want to write about my learning adventures under the title My Cloud Native Adventure. I’ll be keeping all of the articles together in a collection that can be accessed by clicking the previous link.
The first step in my learning for this year is Linux. I’ve used Linux intermittently over the years and know enough to do some damage if I have to but, I really want to improve my Linux skills this year. Linux is such an integral part of the public cloud so, first up had to be a refresher in Linux. I’ll talk more about the resources I’m using shortly but…
First things first
As with most things I write about, there is an Azure twist to my Cloud Native learning. Every time I need it, I deploy an Azure VM running Ubuntu Server so I can practice the things I’m learning. I could use my local WSL2 implementation but I don’t want to break it as I use it every day.
I use the Azure CLI commands below to deploy/destroy the Azure VM as needed. If you need to install Azure CLI you can start here. If you don’t have an Azure subscription handy, you can sign up for free here.
You can access the full script in my GitHub Repo. Give it a star as there will be plenty of updates here as the adventure progresses!
# Set variables you will need below
resourceGroupName=rg-learnlinux
vmName=vm-learnlinux
adminUsername=sysadmin
vnetName=vnet-learnlinux
vnetAddressSpace=172.16.0.0/16
snetName=snet-learnlinux
snetAddressSpace=172.16.16.0/24
nsgName=nsg-learnlinux
nsgSSHRuleName=SSH_Secure
vmImage=UbuntuLTS
sshPublicKeyPath=/home/<username>/.ssh/<keyname>.pub
location=northeurope
myPublicIP=$(curl ifconfig.me) # Obtain your public IP address and place it in a variable.

# Create an SSH Key Pair for use when creating your new linux VM.
# If you are using Linux on WSL2 or natively, you will be able to use 'ssh-keygen' out of the box.
# For Windows 10 and above 'ssh-keygen' is also built in and can be used via the Command Line or PowerShell.

ssh-keygen -m PEM -t rsa -b 4096
# The above command will give you some interactive prompts for naming and password protecting your key pair.
# Remember to place the key pair into your '.ssh' directory.


# Use to log in to your Azure tenant. This version will open a browser window and ask you to sign in.
az login

# Use if, like me, you are logged into multiple tenants in multiple browsers. This will give you a link and code to use instead.
az login --use-device-code

# Use if you have access to multiple subscriptions with a single login.
az account show

# Set the active subscription. Similar to Set-AzContext in PowerShell.
az account set --subscription <SubscriptionID>

# Create Resource Group.

az group create --location $location --name $resourceGroupName

# Create Nework Security Group and add SSH rule.

az network nsg create \
  --name $nsgName \
  --resource-group $resourceGroupName

az network nsg rule create \
  --nsg-name $nsgName \
  --resource-group $resourceGroupName \
  --name $nsgSSHRuleName \
  --description "Secure SSH Access to my Public IP address only" \
  --priority 1000 \
  --access Allow \
  --direction Inbound \
  --protocol Tcp \
  --source-address-prefixes $myPublicIP \
  --destination-port-ranges 22


# Create a Virtual Network for your test VM

az network vnet create \
  --name $vnetName \
  --resource-group $resourceGroupName \
  --address-prefixes $vnetAddressSpace \
  --subnet-name $snetName \
  --subnet-prefixes $snetAddressSpace

# Add NSG to Subnet

az network vnet subnet update \
  --name $snetName \
  --vnet-name $vnetName \
  --resource-group $resourceGroupName \
  --network-security-group $nsgName

# Create your test VM and generate SSH Key Pair for access

az vm create \
  --resource-group $resourceGroupName \
  --name $vmName \
  --image $vmImage \
  --vnet-name $vnetName \
  --subnet $snetName \
  --nsg "" \
  --admin-username $adminUsername \
  --ssh-key-values $sshPublicKeyPath \
  --output json

# You will get a JSON object back similar to the one detailed in the README.

# Save money by deallocating the VM between study sessions or deleting your resources when you're done.

# Deallocate your VM. The only thing you'll get charged for is storage.

az vm deallocate \
  --resource-group $resourceGroupName \
  --name $vmName

# Start VM when you're ready to study.

az vm start \
  --resource-group $resourceGroupName \
  --name $vmName

# If you delete the resource group you will delete all resources contained within it.

az group delete --name $resourceGroupName
Let’s talk resources
Now that you know how I spin up a temporary VM for learning on, let’s talk about the resources I am using for the Linux refresher.
First up, is the Introduction to Linux from The Linux Foundation. Delivered via the edX learning platform, this is a great course for anyone just getting started with Linux or, like me, anyone who needs a refresher. It’s a great place to start. It’s a free course, which is great! You can upgrade by paying a fee if you want to complete assessments and receive a certificate at the end of the course. The free version is fine for my needs.
Next up is Linux Basics for Hackers. This is another great resource and is available on Amazon UK for about £20. While aimed at aspiring security cyber security professionals there is plenty of information here to help anyone wanting to improve their Linux knowledge
Less talk more learn
The first few weeks of my Linux refresher has been primarily refamiliarising myself with key terms, commands, and the shell. I have documented a few of those key items below. I will also keep an updated list in the repo mentioned above. Look for files called key_terms.md and key_cmds.md.
Important: If you are coming from a Windows background, you most likely haven’t ever cared much about case sensitivity in the command line, PowerShell, or the filesystem. When using Linux, you will soon realise that it cares very much about case sensitivity. When running commands in the shell (or in Bash scripts) in particular, you need to pay attention to casing for items like command switches, file paths, and file names.
Key Terms
Key terms to know as you start your Linux learning journey. Keep an eye on the markdown file mentioned above as I will be keeping it updated as I progress with the refresher.
- Open Source Software (OSS): Open Source is a software development model where you create and develop your software in the open. This encourages open collaboration and free access to software. This means that anyone can review and contribute to the software, which can foster greater public trust than closed-source or proprietary software.
- Distribution: A distribution is a collection of software and applications that make up an Operating System based on the Linux Kernel. Distributions can be separated into ‘families’ based on the upstream parent that the OS is based on. An example of a distribution family would be Debian with Ubuntu and PopOS being members of the Debian family.
- Kernel: A Kernel is the foundation layer of your operating system which handles the interactions between the computer hardware and the software running within the operating system. All Linux distributions are based on the Linux Kernel which was first created in 1991, by Linux Torvalds. (ref: Wikipedia)
- Boot Loader: A boot loader is a program that starts first and loads the kernel into memory. The kernel then starts the rest of the operating system. GRUB is the most common boot loader for Linux distributions. See ref. for more details. (ref: itsfoss.com)
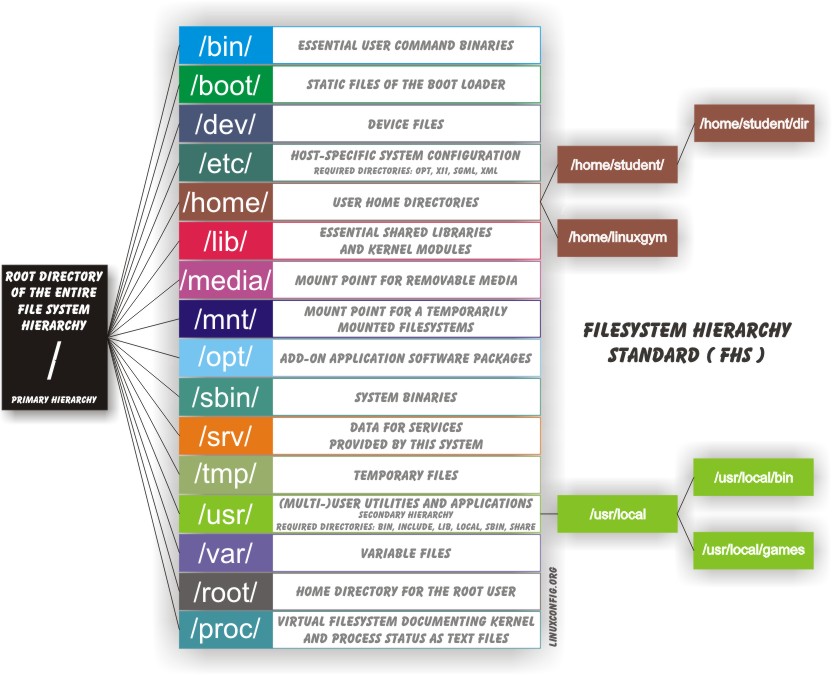
- FHS (Filesystem Hierarchy Standard): The FHS defines the directory structure for Linux OS’. The FHS is maintained by The Linux Foundation. See the image below and the reference for more information on the FHS. (ref: linuxconfig.org/filesystem-basics)
- Working directory: Your working directory is the directory in which you are performing tasks.
- Absolute path: An absolute path is a file or directory path that always starts in the root directory. For example, the absolute path to my home directory is ‘/home/kcooke’. An absolute path always starts with ‘/’.
- Relative path: A relative path always starts in your current working directory and never starts with ‘/’.
- Shell: A shell is the command line interface in a Linux system.
- Bash: Bash or Bourne-Again Shell is a shell language that operates on Linux, macOS, and BSD systems. You can use bash to issues single commands or to author powerful scripts to automate repetitive tasks.
Key Commands
You know the drill by now! :) See below for key commands to be familar with as you get to grips with Linux.
- man: One of the most important things to know when learning a new operating system is how to access information on the various commands. The ‘man’ command shows the reference manual for specific commands. It usually contains a description, syntax, and examples. It’s a great place to start when using a command for the first time.
- ls: Use ’ls’ to list directory contents. Use ‘man ls’ to get more information.
- cat: Use ‘cat’ to concatenate files and, also, to print the contents of file in the terminal. Use ‘man cat’ to get more information.
- cd: Use ‘cd’ to change your current working directory.
- whoami: Use ‘whoami’ to show details on the currently logged in user. Use ‘man whoami’ to get more information.
- hostname: Use ‘hostname’ to show system hostname. Use ‘man hostname’ to get more information.
- pwd: Use ‘pwd’ to print name of current working directory. Use ‘man pwd’ to get more information.
- systemctl: Use ‘systemctl’ to control the systemd system and service manager. Use ‘man systemctl’ to get more information.
- touch: Use ’touch’ to change timestamps on a file. However it’s most common use is to create a new empty file. For example ’touch file.md’ will create a new file called file.md if one doesn’t already exist. Use ‘man touch’ to get more information.
- mkdir: Use ‘mkdir’ to create new directories. Use ‘man mkdir’ to get more information.
- rmdir: Use ‘rmdir’ to remove empty directories. Use ‘man rmdir’ to get more information.
- rm: Use ‘rm’ to remove files and/or directories. Use ‘man rm’ to get more information.
- cp: Use ‘cp’ to copy files and directories. User ‘man cp’ to get more information.
- mv: Use ‘mv’ to move or rename files and directories. User ‘man mv’ to get more information.
- grep: Use ‘grep’ to search for patterns. This is a very useful utility when you get to know it. Use ‘man grep’ to get more information.
- sudo: Use ‘sudo’ to execute a command as the superuser or as another user. Use ‘man sudo’ to get more information.
Please Note: I am not affiliated with any of the organisations or businesses linked above. These are my recommendations, I have not been paid to talk about any of the above.
Thank you for taking the time to read this article. Feel free to reach out on social media if you want to chat or discuss any of this further.